Remote Storage
In Enterprise Edition you can not only store files on a hard drive, but also connect Azure Blob Storage, Google Cloud or any S3 compatible storage (i.e. AWS S3).
You can upload files from your PC to connected cloud storage or use already uploaded files from cloud storage as a source (without duplicating it).
How we store files
Supervisely uses DATA_PATH from .env (defaults to /supervisely/data) to keep caches, database and etc. But we are interested in storage subfolder generated content, like uploaded images or neural networks are stored.
You can find two subfolders here:
<something>-public/<something>-private/
That's because we maintain the same structure in local storage as if you would use a remote storage. In that case those two folders are buckets or containers. You may notice that one has "public" in it's name, but it only reflects the kind of data we store in it. Both buckets are private and does not provide anonymous read.
Configure Supervisely to use S3 compatible storage (Amazon S3, Minio)
This section describes how to configure Supervisely to store its data on a cloud storage rather than on a hard drive. This won't allow you to use existing images and videos on your cloud. If you need to use existing images and videos, please check the section below.
Edit .env configuration file - you can find it by running supervisely where command.
Change STORAGE_PROVIDER from http (local hard drive) to minio (S3 storage backend).
Also, you need to provide STORAGE_ACCESS_KEY and STORAGE_SECRET_KEY credentials along with endpoint of your S3 storage.
For example, here are settings for Amazon S3:
STORAGE_ENDPOINT=s3.amazonaws.comSTORAGE_PORT=443
So in the end, here is how your .env settings could look like:
Execute sudo supervisely up -d to apply the new settings.
If you're working with large files (4GB+) you might also want to add permission for "s3:ListBucketMultipartUploads" at the bucket level, so Supervisely can initiate multipart uploads for larger artifacts.
Configure Supervisely to use Azure Blob Storage
This section describes how to configure Supervisely to store its data on a cloud storage rather than on a hard drive. This won't allow you to use existing images and videos on your cloud. If you need to use existing images and videos, please check the section below.
Edit .env configuration file - you can find it by running supervisely where command.
Change STORAGE_PROVIDER from http (local hard drive) to azure (Azure storage backend).
Also, you need to provide STORAGE_ACCESS_KEY (your storage account name) and STORAGE_SECRET_KEY (secret key) credentials along with endpoint of your blob storage.
Here is how your .env settings could look like:
Execute sudo supervisely up -d to apply the new settings
Configure Supervisely to use Google Cloud Storage
This section describes how to configure Supervisely to store its data on a cloud storage rather than on a hard drive. This won't allow you to use existing images and videos on your cloud. If you need to use existing images and videos, please check the section below.
Edit .env configuration file - you can find it by running supervisely where command.
Change STORAGE_PROVIDER from http (local hard drive) to google (GCS backend).
Also, you need to provide STORAGE_CREDENTIALS_PATH credentials file generated by Google.
Here is how your .env settings could look like:
Now create docker-compose.override.yml under cd $(sudo supervisely where):
Execute sudo supervisely up -d to apply the new settings
Migration from local storage
Now, copy your current storage to an S3. As we mentioned before, because we maintain the same structure in local filesystem, copying will be enough.
We suggest to use minio/mc to copy the files.
Run minio/mc docker image and execute the following commands:
Finally, restart services to apply new configuration: supervisely up -d.
Keys from IAM Role
If you want to use IAM Role you must specify STORAGE_IAM_ROLE=<role_name> in .env file then STORAGE_ACCESS_KEY and STORAGE_SECRET_KEY variables can be ommited.
IAM Roles are only supported for AWS S3.
Frontend caching
Since AWS and Azure can be quite price in case of heavy reads, we enable image caching by default.
If the image is not in the preview cache but in the STORAGE cache it will be generated and put into previews cache, but it will not be fetched from the remote server.
Here are the default values (you can alter them via docker-compose.override.yml file):
Links plugin cloud providers support
If you already have some files on Amazon S3/Google Cloud Storage/Azure Storage and you don't want to upload and store those files in Supervisely, you can use the "Links" plugin to link the files to Supervisely server.
Instead of uploading actual files (i.e. images), you will need to upload .txt file(s) that contains a list of URLs to your files. If your URLs are publicly available (i.e. link looks like https://s3-us-west-2.amazonaws.com/test1/abc and you can open it in your web browser directly), then you can stop reading and start uploading.
If your files are protected, however, you will need to provide credentials in the instance settings or manually create configuration file.
Azure SAS Token minimal permissions
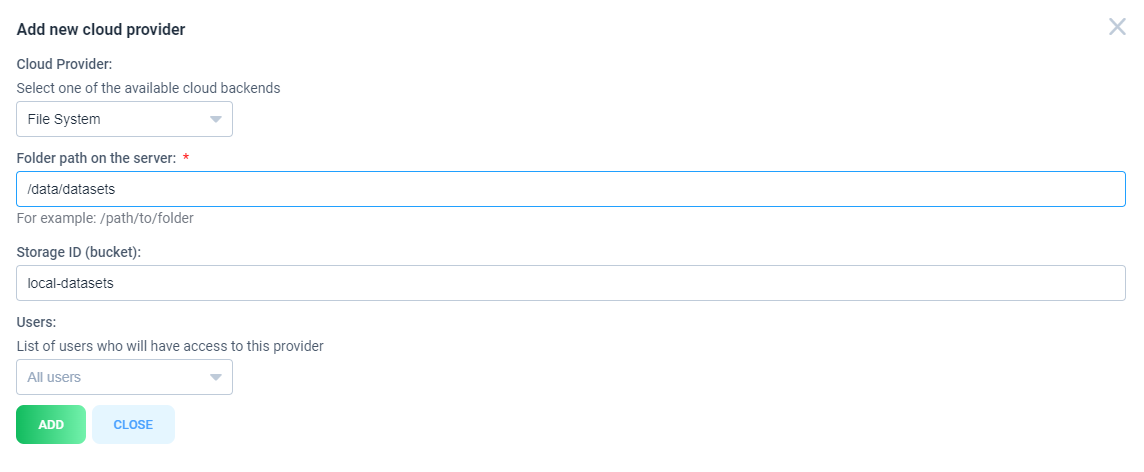
File system provider
Folder path on the server - path to folder on the host server that will be mounted
Storage ID (bucket) - mouted folder identifyer. It will be used in links to mounted folder
For instance, for the example above, when you want to add a new assets (image or video) with local path on your hard drive /data/datasets/persons/image1.jpg, use the following format in API, SDK or corresponding application: fs://local-datasets/persons/image1.jpg
Manual configuration
If you are brave enough, you can create configuration files manually:
Example configuration file:
Links file structure:
Links file example:
Create a new file docker-compose.override.yml under cd $(sudo supervisely where):
Then execute the following to apply the changes:
Google Cloud Storage secret file example, docker-compose.override.yml:
Last updated